External circlips are among the most reliable and cost-effective fasteners in mechanical engineering. Found in everything from automotive gearboxes to industrial conveyor systems, they provide a compact solution for preventing axial movement of components on a shaft. Yet despite their simplicity, improper installation or removal is one of the most common causes of premature component failure in assemblies that use them. This guide covers everything you need to know about how to install and remove an external circlip correctly, safely, and efficiently—whether you are working on a single repair or managing high-volume production.
Content
What an External Circlip Does and How It Works
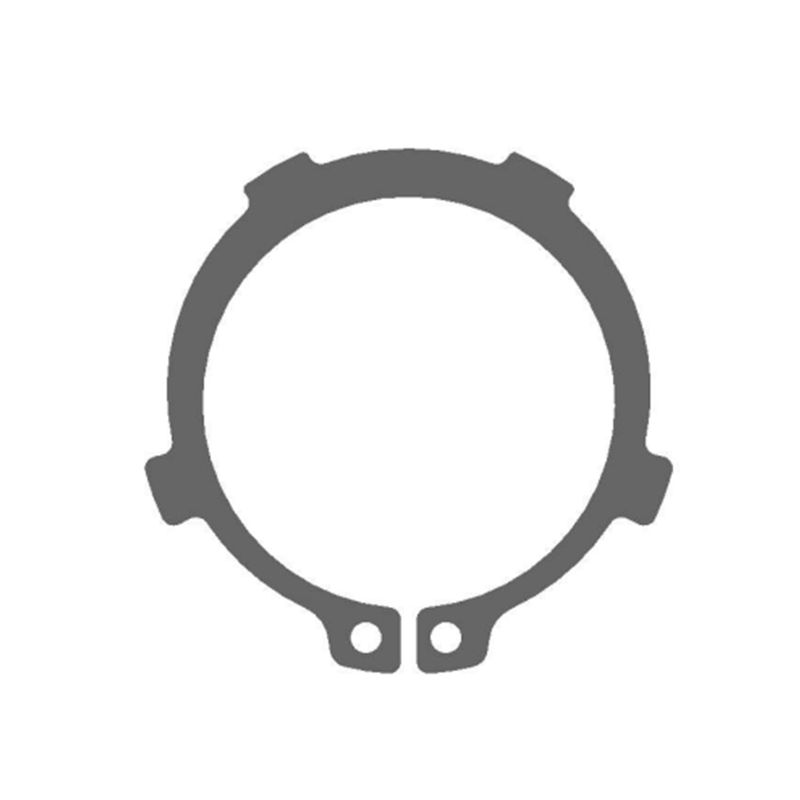
An external circlip—also referred to as an external retaining ring or external snap ring—is a semi-flexible open-ended metal ring designed to seat into a machined groove on the outside surface of a shaft. Once installed, it acts as a mechanical shoulder that prevents mounted components such as bearings, gears, pulleys, or bushings from sliding axially along the shaft during operation.
The key dimensional feature of an external circlip is that its inner diameter is slightly smaller than the diameter of the shaft groove it is designed to fit. This interference ensures that once the ring is released into the groove, it contracts and grips the groove walls firmly. The clip does not rely on friction alone—it physically locks into the groove geometry, making it resistant to vibration, shock loads, and the thermal expansion that can loosen other types of fasteners over time.
External circlips are most commonly manufactured from spring steel or stainless steel. Spring steel variants offer high tensile strength and fatigue resistance, making them suitable for dynamic applications. Stainless steel versions provide superior corrosion resistance for use in wet, chemical, or food-grade environments. Standard specifications include DIN 471 for metric shafts and ANSI/ASME B27.7 for imperial applications, so always confirm the relevant standard when sourcing replacement rings.
Tools You Need Before Starting
Attempting to install or remove an external circlip without the correct tools is the single most common cause of injury, ring deformation, and groove damage. The following tools are required or strongly recommended before beginning any circlip work.
- External circlip pliers (pointed-tip, outward-opening): These are the primary tool for external circlip work. The pointed tips insert into the small lug holes on either end of the circlip. Squeezing the handles opens the tips outward, expanding the ring so it can clear the shaft diameter and be guided into the groove. Never attempt to expand an external circlip with a flathead screwdriver or general-purpose pliers—this deforms the ring and compromises its holding capacity.
- Circlip pliers with adjustable tips: For workshops handling multiple shaft sizes, adjustable-tip circlip pliers save time and reduce the need for multiple dedicated tools. Confirm that the tip diameter matches the lug hole size of the circlip being used to avoid slippage during expansion.
- Safety glasses: An external circlip under tension stores significant elastic energy. If the pliers slip during installation or removal, the ring can launch at high velocity. Eye protection is mandatory, not optional.
- Penetrating oil (for removal of corroded rings): If the circlip has been in service for an extended period or is exposed to corrosion, a penetrating lubricant applied 10–15 minutes before removal will significantly reduce the force required and minimize groove damage.
- Circlip installation tool or depth gauge: For precision assemblies, a depth gauge confirms that the groove depth and width conform to specification before installing a new circlip. An undersized or oversized groove will prevent proper seating and must be corrected before assembly proceeds.
How to Install an External Circlip Step by Step
Correct installation of an external circlip requires preparation, controlled technique, and a final verification check. Follow this sequence for reliable results every time.
Step 1 – Inspect and Prepare the Groove
Before touching the circlip, inspect the shaft groove thoroughly. Look for burrs, debris, rust, or any deformation from previous assemblies. The groove walls must be clean and sharp-edged. Any raised material inside the groove will prevent the circlip from seating fully, leaving it partially proud of the groove and vulnerable to being dislodged under load. Clean the groove with a lint-free cloth and, if necessary, a fine file to remove any raised burrs.
Step 2 – Select the Correct Circlip
Match the circlip to the shaft diameter and groove specification. The circlip's inner diameter should be slightly smaller than the shaft groove diameter—typically by 0.1mm to 0.3mm depending on the size standard. Using a ring that is too large will result in insufficient grip; a ring that is too small will require excessive expansion force that risks permanent deformation. Cross-reference the DIN 471 or relevant standard table to confirm the correct part number for your shaft size.
Step 3 – Engage the Circlip Pliers
Insert the pointed tips of the external circlip pliers into the lug holes located at each open end of the ring. The tips must be fully seated in the holes—not resting on the surface of the ring. Partially engaged tips are the leading cause of plier slippage during expansion, which can damage the ring or cause injury.
Step 4 – Expand and Position the Ring
Squeeze the plier handles steadily to expand the retaining ring until its inner opening is wide enough to clear the shaft outer diameter. Slide the expanded ring over the shaft end and move it along the shaft until it is positioned directly over the groove. Keep the ring perpendicular to the shaft axis throughout this movement—a tilted ring will not drop cleanly into the groove.
Step 5 – Release and Verify Seating
Once the ring is centered over the groove, release the plier handles gradually so the circlip contracts into the groove under its own spring force. Do not snap the pliers open abruptly—a controlled release ensures the ring seats evenly around the full circumference of the groove. After release, verify seating by running a fingernail or a probe around the full circumference of the ring. Any section that rises above the groove surface indicates incomplete seating and must be corrected before the assembly proceeds.
How to Remove an External Circlip Safely
Removing an external circlip follows the installation process in reverse, but there are several additional considerations depending on the condition of the ring and groove.
- Apply penetrating oil if needed: For circlips that have been in service for a long time or show signs of surface corrosion, apply penetrating oil around the groove area and allow it to soak for at least 10 minutes before attempting removal. This reduces the friction between the ring and groove walls, protecting both surfaces.
- Re-engage the pliers into the lug holes: Insert the pointed tips of the external circlip pliers fully into the lug holes. Squeeze the handles to expand the ring until it clears the shaft diameter, then slide it away from the groove and off the shaft end.
- Use a flathead screwdriver as a last resort: If the lug holes are damaged or inaccessible, carefully work a flathead screwdriver under one side of the ring and lever it upward out of the groove. Apply force gradually and evenly to avoid gouging the shaft or groove. This method risks groove damage and should only be used when pliers cannot engage the ring.
- Cut the ring if deformed or seized: In cases of extreme corrosion, heavy deformation, or a seized ring, use a rotary cutting tool to carefully cut through the ring at one point. Exercise extreme caution to avoid cutting into the shaft surface. Once cut, the ring can be pried open and removed without requiring expansion.
- Always replace removed circlips: A circlip that has been removed from a groove has been fully expanded and then contracted, which subjects it to plastic deformation at the lug ends. It is industry best practice to replace every removed external circlip with a new one rather than reinstalling the original, regardless of visual condition.
Common Mistakes and How to Avoid Them
Even experienced technicians make preventable errors when working with external circlips. The table below summarizes the most frequent mistakes encountered in production and maintenance environments, along with their consequences and corrective actions.
| Mistake | Consequence | Corrective Action |
| Using wrong plier type | Ring deformation, plier slippage, injury | Always use outward-opening external circlip pliers |
| Reusing removed circlips | Reduced grip strength, risk of ejection under load | Replace with new circlip after every removal |
| Installing in damaged groove | Incomplete seating, axial retention failure | Inspect and clean groove before installation |
| Wrong circlip size | Ring slips out or cannot be installed | Cross-reference DIN 471 or equivalent standard |
| Skipping seating verification | Partial seating causes component ejection in service | Always probe full circumference after installation |
| No eye protection | Eye injury from ejected ring | Wear safety glasses throughout the procedure |
Selecting the Right External Circlip for Your Application
Not all external circlips are interchangeable, and selecting the wrong variant for an application leads to premature failure. Beyond shaft diameter and material, consider the following selection factors before specifying a circlip for a new design or repair:
- Static vs. dynamic load: Standard external circlips handle moderate axial loads. For applications involving shock loads, high rotational speeds, or vibration, specify heavy-duty external circlips with increased radial wall thickness.
- Temperature range: Standard spring steel circlips are typically rated to around 300°C. For high-temperature applications, confirm the material's rated service temperature and consider heat-treated alloy steel variants.
- Maintenance frequency: For assemblies requiring frequent disassembly, specify external circlips with lugged ends (lug holes intact and well-formed). These make plier engagement faster and reduce the risk of damage during repeated removal cycles.
- Corrosive environments: In marine, chemical processing, or outdoor applications, stainless steel external circlips provide reliable corrosion resistance without the need for additional surface coatings.
Mastering the correct procedure for how to install and remove an external circlip is a fundamental skill for anyone working with mechanical assemblies. By using the right tools, verifying groove condition, confirming correct sizing, and following a disciplined installation and removal sequence, you eliminate the most common causes of circlip-related failures and extend the service life of every assembly that depends on them.